Blogger Plant lighting requirements:
Aquatic Plants require different lighting needs depending on where they come from around the world. Some will need very low light while others need very high light to grow to their full potential. Below is listed some of the more popular plants you will likely come across. This is by no means a full listing and represents only some of the many plants available.
A= Attatched. B= background. M=midground. F=forground. FL=floating plant.
LOW LIGHT REQUIREMENTS:
Anubias barteri var: barteri. (A)
Anubias Nana. (A)
Anubias Petite. (A)
Bolbitis heudelotii (A)
Ceratophyllum demersum “foxtail” (FL/B)
Cladophora aegagropila (F)
Cryptocoyne wendtii "green" (A)
Echinodorus “ozolot” (B/M)
Echinodorus “ozolot green” (B/M)
Eleocharis parvula (F)
Hygrophila corymbosa “siamensis” (M/B)
Hygrophila polysperma (M/B)
Hygrophila polysperma “big leaf” (B)
Marsilea hirsute (F)
Microsorum “pteropus” (A/M)
Microsorum “narrow” (AM)
Microsorum “philippine”(A/M)
Microsorum “windelov” (A/F/M)
Monosolenium tenerum (A/F)
Vallisneria nana (B)
LOW TO MEDIUM LIGHT REQUIREMENTS:
Alternanthera reineckii (B)
Aponogeton Longiplumulosus (B)
Aponogeton Madagascariensis (Centre/B)
Bacopa Carolinian (M/B)
Bacopa australis (M)
Bolbitis heudelotii (A/B)
Cabomba caroliniana (FL/B)
Cardamine lyrata (B)
Crinum natans (Centre)
Cryptocoryne becketii (A/M)
Cryptocoryne balancsae (A/B)
Cryptocoryne wendtii “brown” (F/M)
Cryptocoryne wendtii “Mi Oya” (M)
Echinodorus “aquartica” (F)
Echinodorus Barthii (B)
Echinodorus bleheri (B)
Echinodorus “ozolot” (M/B)
Echinodorus palaefolius “latifolius” (M/B)
Echinodorus palaefolius “tropica”(F)
Echinodorus “red special” (M)
Echinodorus “rosé” (M/B)
Echinodorus tenellus (F)
Elodea (egeria) densa (M/B)
Eleocharis parvula (F)
Hemianthus callitrichoides “cuba” (F)
Hemianthus micranthemoides (F/M)
Hygrophila corymbosa “siamensis” (M/B)
Hygrophila polysperma(M/B)
Jancus repens (M/B)
Lilaeopsis macloviana (M?b)
Ludwigia repens (B)
Ludwigia repens “rubin” (B)
Pogostemon helferi (F)
Ricca fluitans (A/F/M/B)
Shinnersia rivularis “weiss-grùn” (M/B)
MEDIUM TO HIGH LIGH REQUIREMENTS:
Bacopa monnieri (B)
Didiplis diandra (F/M)
Hygrophila diffomis (B)
Limnophila aquatica (B)
Nesaea crassicaulis (M/B)
Nymphaea lotus (Centre/B)
Rotala rotundifolia (B)
VERY HIGH LIGHT REQUIREMENTS:
Ceratopteris thalictroides (M/B)
Glossostigma elatinoides (F)
Heteranthera zosterfolia (B)
Hydrocotyle sibthorpiodes (maritima) (F)
Hygrophila corymbosa “red” (B)
Hygrophila guianensis (M/B)
Hygrophila polysperma “rosanervig” (M/B)
Limnophila arommatica (M/B)
Ludwigia arcuata (B)
Lysimachia nummularia “aurea” (M)
Micranthemum umbrosum (F)
Pogostemon stellata (eusteralis) (M)
Rotala sp: green (B)
Rotala sp: “nanjenshan” (mayaca) (F/M)
Samolus valerandi (M)
Of course some of these placements can be moved to create a more pleasing effect. E.G. Rotala sp: “nanjenshan” (mayaca) can be placed at the rear by creating a mound and planting at the rear of the tank.
Monday, March 17, 2008
Monday, February 11, 2008
Algae Guide
So you have got the dreaded weed in your tank? Let me start by saying DON’T PANIC. All is not lost. I turned this disaster 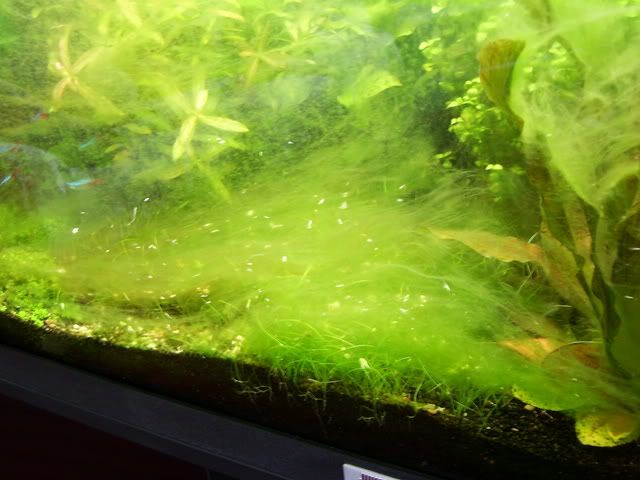 Into this 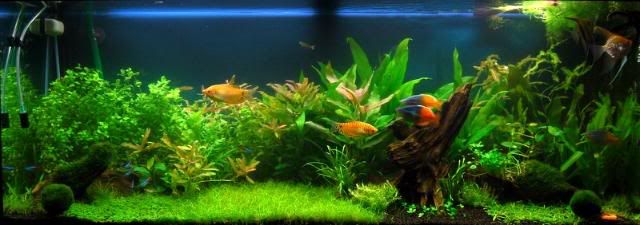 Algae is the most problematic in all aquariums from the simplest of set ups to the most advanced, every tank either has or will experience algae at some stage of the tanks life, and apart from the fish and plants you have, it is the most natural of things in it. I personally don’t mind some algae in my tanks and have learnt how to control it as the pictures above show, others don’t like any form of algae and go to great lengths to make sure it stays away. Trying to control algae is not as bad as it sounds. So what is algae? How does it get into the tank? And most of all how do we get rid of it? Algae is probably the most natural of all things in your tank, weather it is a low light tank, high tech tank, or you have just a few fish in your tank, algae is always present in some way shape or form. Were ever there is water there is always algae. Algae uses the main 3 things that plants use to grow, algae will be come a problem when the balance is not correct and uses them to its own advantage before the plants do, this could be one of the main 3 things, e.g.: light, nutrients, c02. For this article algae is a photosynthetic organism that needs light, water and nutrients to prosper, elements which are readily available in any aquarium. Getting rid of it from your aquarium is not very difficult. Knowing that, controlling and algae should be your goal. There are several different types of algae that can affect an aquarium; the main four you will probably come across are brown, green, black bush & blue green (not truly algae but bacteria) Other forms of algae include: green spot, staghorn, green water, green bush, green dust, hair thread, cladophora, rhizoclonium(as in the top picture) There are 4 main types of algae (but more do exist) that aquariums can have. Brown algae Green algae Red/brush algae Blue green algae (cyanobacteria) Brown Algae (Diatoms) 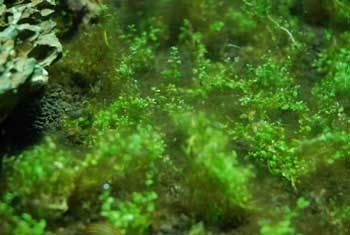 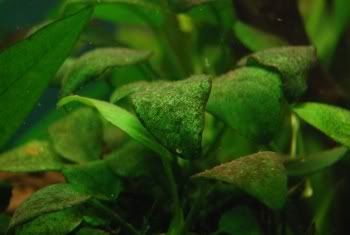 This will probably be the first type of algae any one will encounter in the aquarium and could appear from early on and will normally disappear when the tank stabilises and becomes more mature. Brown algae could be in the form of a fluff like or spot appearance on leaves or décor. Unless you are aiming for a high tech planted set up, it is important to reduce nutrient levels if possible, not to feed excess and keep up with full tank maintenance. As this algae grows well in low light, reducing light levels doesn’t help and could out do the green algae, so adding more light could help to rid brown algae. If brown algae appears in an established tank then all tank stats need to be checked and lighting tubes if older than 8/12 mths may need to be replaced as they lose their intensity. Some will even change the tubes every 6mths to maintain good lighting in their tanks. Green Algae (hair, bushy, dust) 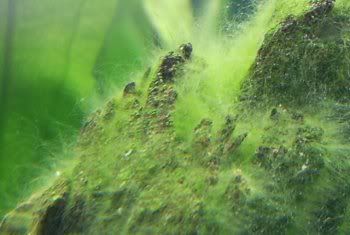 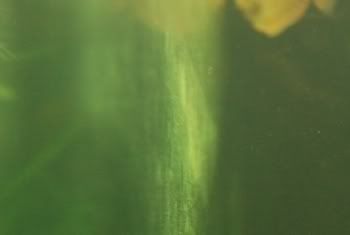 Is probably the most common of all algae you will come across in your aquarium and can take on many forms, from spots, hair, or bushy appearance. Light green in color and can reach lengths of over 1 inch. If left on its own, it will cause problems. It tends to grow in clumps that can easily be scraped off although it can return quickly. Possible causes: High light Low c02 Low nitrate Possible solutions: Reduce amount of lighting Increase nitrate levels Increase c02 Black bush, Black Beard, BBA. 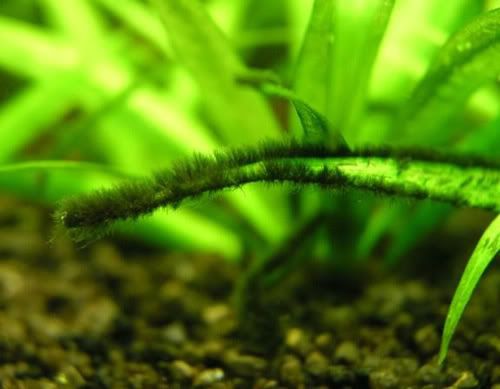 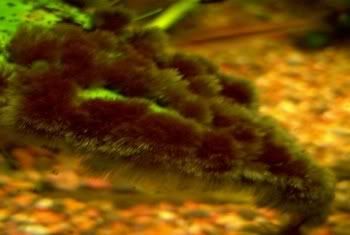 Can be found growing on leaf edges of slow growing plants, bog wood and around filters etc. Grows in clumps or patches of fine black tufts up to about 0.5cm long. Possible causes: Low or fluctuating CO2 levels. Could also indicate a high kH problem. Possible solutions: Increase the levels of CO2, levels should ideally be 30ppm. Improve water circulation around the plants Good water flow is also important. In low light tank reduced water changes for a time may help resolve the problem or overdosing excel to keep the c02 stable. Blue Green Algae (cyanobacteria)  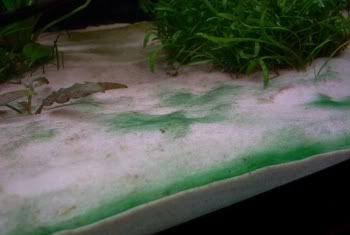 Not truly an algae but bacteria. Covers everything in a blue/green slimy sheet. Easily peels off but grows back again very quickly. It has a foul smell. It is very commonly found in the substrate and especially along the front where gravel meets glass but also can be found at the back of the tank and on décor. I have found from around most forums that it mostly affects tanks with bright coloured gravel; this is not always the case as it does also affect darker gravel. Possible causes: Very low nitrates or higher levels of other nutrients. Dirty substrates and filters can also bring it on. Poor water circulation Possible solutions: Check water stats Improving water circulation can also help to reduce this algae. If all else fails a black out could be the way to remove it. As a last resort you could use “erythromycin” but this WIIL affect the bacteria in the filter so great care must be taken. Green Spot Algae 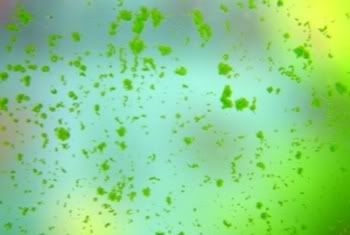 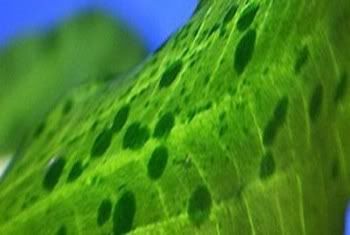 Forms hard green circular spots on the glass and slow growing plant leaves. Possible causes: Low c02 and possible Low p04 levels To long a lighting period Possible solutions: Check CO2 levels. Check p04 levels Reduce lighting period Can be scraped off the glass using a razor blade or a good magnetic glass scraper. Between 8 and 10 hours should be plenty of lighting time for the plants. If it is more then reducing it may help. Stag horn Algae   Grows in strands like a stags antlers. Black to grey/green in colour and sometimes a reddish tint. Possible causes: Low CO2. Overfeeding fish and excess mulm. Dirty filter. Also disturbing dirty substrates without doing water change afterwards. Possible solutions: Check CO2 levels. Reduce feeding, Vacuum the substrate and remove mulm. Overdosing Flourish Excel may help. Green Water: 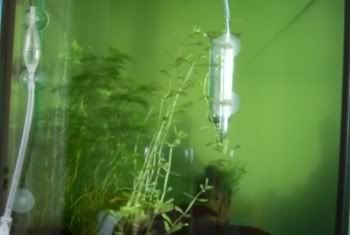 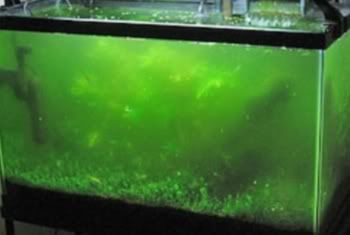 Possible causes: High lighting High ammonia (nh4) High nutrient levels Disturbance of dirty substrate Mass over feeding Direct light on the tank Possible solutions: Reduce lighting Check ammonia levels Check water stats Check no over feeding Check no outside light source is on the tank Conclusion: The above causes & solutions are not exhaustive and are only a guide to the possible cause & solution. At the end of the day if your tank has any form of algae it will be down to the water nutrients balance weather it be a fish only tank or a planted tank. Algae can & is caused by one or more of the nutrients either being to high or to low wrong lighting or lack of c02, trying to find which one can be more difficult than removing the algae its self. |
Algae Alert
So you got the algae bug and you want to know why? What to do? And how to get rid of it? I will try and answer the above in one simple answer! So now you think that all you have to do is add nutrients and fertilizers and all will be fine. Well it’s not quite that simple.What you have to do is get the right nutrients and or fertilizers, and the correct amount (balance) in the tank or you end up with what you don’t want. ALGAE all over your tank. At the end of the day algae is a plant, and you have the conditions in your tank for growing plants so in stands to reason that algae is going to grow if the conditions are right just as much as any other plant in your tank.When people get algae in the tank they tend to panic and start throwing in all sorts of anti algae drops and anything else they think will kill it, just as I did when I first got my first bloom. Unfortunately it doesn’t work that way nor is it that easy.Plants and algae need 4 basic things to live and survive correctly. Light, nitrogen, phosphate and potassium. Both plants and algae fight to the end to compete for the best of everything in the tank.You have enough light because you may, as I have done have just put in the extra tube, the fish are throwing out all sorts of nitrogen and probably phosphate as well in their waste and the only thing that is not in any large amounts is potassium, one of the most over looked additions. There is no evidence that I have found that potassium invites or encourages algae in any tank.But again if you do as I did and remove all the phosphates from the water then the plants will not flourish and will be weak and leave them then being unable to take up other vital nutrients that they need to survive, (without going into to much detail) plants need a good supply of all nutrients to be able to take onboard other nutrients. Which for example can lead to high nitrate levels if the plants don’t consume enough nitrAte, this is then left in the water. Again with out going into great detail there is what is considered to be main elements that plants need to survive well, these are broken down into 2 groups:
Some of these I have only read about, some I do know about and some that I have first hand experience of, but as with everything, we are learning all the time.Higher plants consume the nutrients faster and easier than the lower ground plants thus leaving very little for the algae to feed on. That doesn’t mean though you will not get algae, you will because it came in when you started putting plants in the tank and they were not quick enough to get to the nutrients before the algae did.The fewer the plants you have the more likely algae will appear as the plants don’t use up all the nutrients so leaving more for the algae to amass itself.IMO it would probably be easier to rid algae in a fish only tank, for as I was going to attempt a black out period to rid the algae I decided against it, as for the plants need light to thrive, so I still don’t know if a black out of a planted tank works or not. I must admit I have probably learnt more about algae in my time of fish keeping than I have about fish keeping its self. The latest bloom happened when I tried to put in a new laterite under the gravel, I messed it up and ended up with what you see in the other pictures because of the excess iron in the water instead of under the gravel to feed the roots. Although there are different forms of algae, excess iron is the most common cause of hair algae, which is like threads of very fine green hair growing over the tank which I found to be more prominent in the upper half of the tank and around the filter top where the water outlet is, as this is where algae can also consume vast amounts of oxygen. It has been stated in another article on a different site that iron is easy to get rid of with water changes, and I do agree to a certain level, but when you do what I did it is NOT that easy.Although I am trying to explain about the nutrients plants need, I have to add that other elements the likes of cleanliness of water, regular water changes (of which too many over a short time can be just as bad as no water changes) all play a part in keeping ALGAE away.So over all, the key to a clean near algae free tank has a lot to do with BALANCE. I am not going to say there are many ways to rid algae but more reduce it and stunt its growth, as I have tried to explain it is all about NUTRIENT CONTROL, but there are dips and chemicals available to aid this should you need, or should I say WHEN you need. |
MY TANKS LOG
I will build this article as i go along and update as things happen or i change my tanks for any reason. It will be a bit topsy turvy untill i get things in the right order.
I am going to start with the weekend:
9/10 february 2008:
I nearly lost my zebra danios yesterday morning. I had moved them last week into the tank I was using for the angel fry. All seemed to be ok and put in some plants so it wasn’t so bare and as a growing on tank for the plants.
Any way long story short I did a WC yesterday and all was ok. Last night they seemed to by a little dozy but not being to good my self I thought it was just me.I got a wake up call in the morning from my partner that something was wrong with them. I got and seen them and new some thing was wrong. Did a 75% WC and then did a water test.
OOOOhhhhhh boy no wonder they were not in best form. Ammonia had gone through the roof as had nitrites. Got them out I hope just in time and let them settle in the other tanks water before placing them back into the larger tank.Today they all seem to be picking up and getting back to normal.
BUT when I got up this morning I found I had lost one of my first fish I got “boasmani rainbow” I was devastated to have lost one of my best friends. Had her for 2yrs. So I did water checks again and the small tank ammonia 0 but nitrites still through the roof (only plants in there now) and checked the 240L and now I have .25 ammonia, and pH has dropped to 6 or less so for some reason every thing is going wrong this weekend and I don’t know why or what is happening I am just doing WC on the 240 in the hopes I get it sorted out and not lose any more friends.
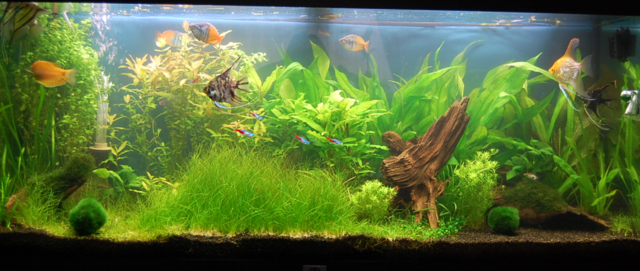
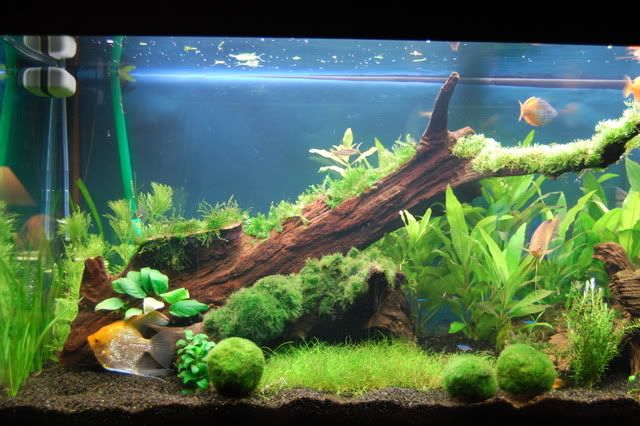
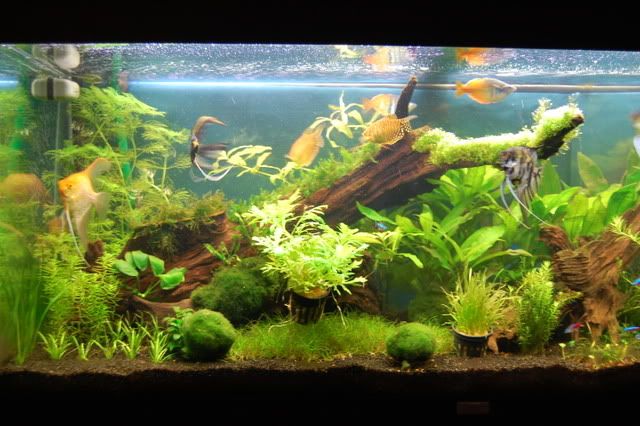
This is my 240L tank set up 12mths ago. I have let it go over grown of late because of ill health but have just lately started to redo the tank.
It started as i was doing a WC and started to trim back a few plants, and one thing led to another and before i knew it i had trimmed every thing right back.
I wasnt planning on doing this but i started so i now have to finish it.
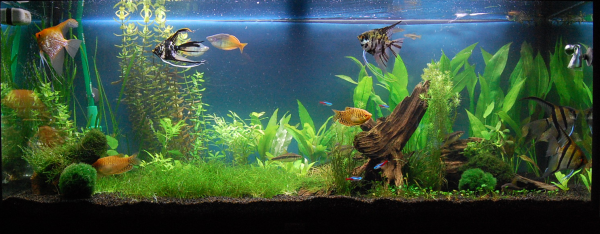
I trimmed all the plants starting on the right side of the tank and in doing so found two "ehinodorus ozolots that i thought i had lost some time ago. So i removed a lot od dead & damaged leaves to clear space for them to go back in. Although i didnt intend and have no replacement plants to go in the empty spaces as yet i re layed them the best i could to end up with what you see below.
On the left side i did the same sort of thing, i srtipped dead and old leaves to again leave gaps.
I removed all the plants on the left side as some were the worse for algae and cleaned them up the best i could. i am going to replant the left side with what i have left of the original plants.
I have noticed in the few days this has been going on that the tank is a lot brighter with not being so over grown and the plants are pearling more than ever.
its 12mths since setting the tank up and needs new tubes so they are on my shopping list at the present moment.
11th February 2008:
Yesterday (Sunday) I did water checks on the 240 and found ammonia had risen above zero of which I had never had I this tank since setting it up. I checked again this morning and found ammonia was still above zero but below .25 but was enough to have me worried as to why this has happened.
I have over the past few days done a lot of cleaning and moving plants around as well giving the filter a damn good clean out which was long over due as the filter pads where like a mud bath, I didn’t touch the bio balls when I cleaned the filter out.
I also today did another trim of the hair grass at the front left side of the tank. I am still trying to work out the best way to re plant what I have taken out and have in storage at the moment. I have also acquired some artificial bog wood pieces one of which I want to use in the tank but again haven’t yet decided on its position.
The tank stats at this time are:
pH = 6
ammonia = .25
nitrites = 0
nitrates = 5
kH = 2
gH = 4
p04 = 0
Although kH has risen from 1 the pH has dropped from 6.4 down to 6. so when ammonia has gone I am going to buffer to raise the kH to 5 and this should also raise the pH back up again.
12th February 2008:
I checked all stats again this morning and every thing was back to normal again.
Now all stats are safe again I want to get the pH & kH up higher. I am aiming for
kH of approx 5 and pH higher than 6.
I added 2 teaspoons of baking soda to approx ½ litre of tank water and mixed well till all had dispersed.
I waited 4 hours and rechecked the water stats. The pH had risen from 6 up to 6.4 and kH had risen from 2 up to 3 so I intend on adding another 2 teaspoons of baking soda tonight.
Given the last rise of 1 kH & .4 pH I would expect to see the same rise again which should take the reads to pH 6.8 & kH 4.
13th February 2008:
Checked all stats again this morning and I am now happy with the results although a little surprised at the kH, I had only expected a rise of 1dg.
The kH has risen by 2dg not 1dg as I had thought it would from 3dg to 5dg.
The pH has risen as expected from 6.4 to 6.6.
The full tank stats now are:
pH = 6.6
Ammonia = 0
Nitrites = 0
Nitrates = 5
kH = 5
gH = 4
P04 = 0
Conclusion:
I have added in total over 48hrs 4 teaspoons of baking soda to the 240L tank and this has had the result of raising the pH from 6 to 6.6 a rise of .6
kH has risen from 2dg to 5dg a rise of 3dg.
The stripped angels have spawned again (that’s another story) over night so I would assume all is ok with in the tank.
All that leaves me to do now is to finish re laying the tank as I have not been able to the last few days.
I need to finish the left side that have the plants tied with lead weights at the moment and to trim around the right side where the bog wood is. I am hoping to have this finished by the end of the week or early next week.
I think I have also created my own problem with trying to re lay the tank. with all the messing about over the last week I seem now to be going down the algae root again as I did last year with constant cloudy water and green dust algae on the glass.
I will be watching very closely over the next few days as to what is going on. I have removed a lot of the plants and I think that this could be the problem as there is to much nutrients in the water for them to take up. I am going to reduce the lighting over the next week by cutting out 1 set of lights and to see if this helps until the pants start to grow back or I can get my hands on some extra plants.
19th February 2008:
Well since the 13th all has been so so with the tank. There is a constant white mist in the tank at the moment but I have put this down the all the re arranging of the plants and a major gravel vac last week.
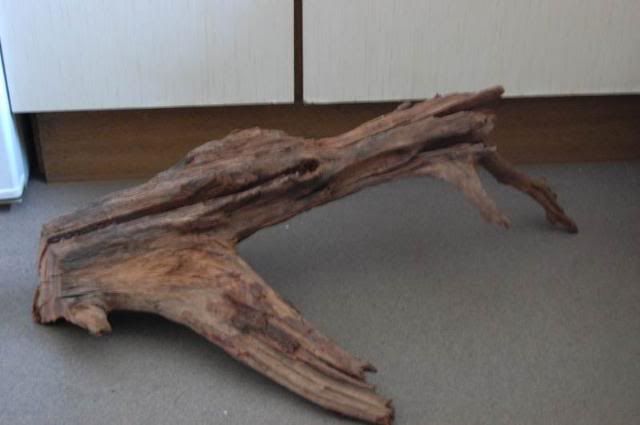
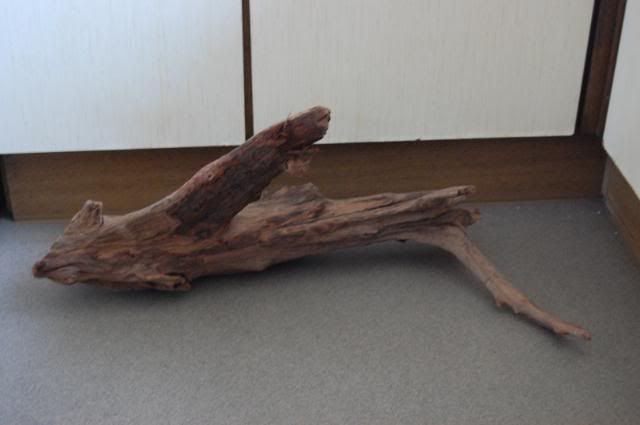
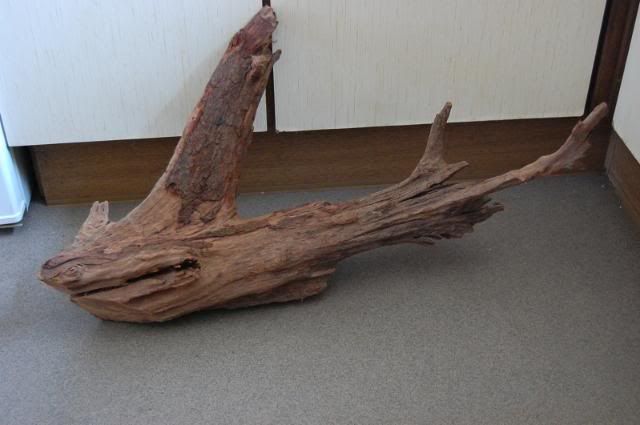
I am in the process of completely re scaping the tank and have already got a nice piece of bogwood for the new scape. I am just waiting for the plants to arrive which have been ordered but not 100% sure when they will arrive. Here are some pics of the bogwood.
The plants I have ordered are:
Name of plant qty tropica No
Bolbitis heudelotii x2 006
Ceratopteris thalictroides x2 005A
Cladophora aegagropila x3 000C (moss balls)
Hemianthuus callitrichoides x3 048B
Hygrophila corymbosa “red” x3 053
Hygrophila difformis x2 051
Limnophila aquatica x2 046
Nymphaea lotus x2 019
Pogostemon helferi x2 053H
Ricca fluitans x2 001
Shinnersia rivularis x2 053E
Total 25 plants
28th February 2008:
Well all is not what I had planned. I am having trouble getting my plants I ordered and lost the angel fry (again) and ended up having to do a BO to get rid of the pea soup in the tank. The GW was because of all the moving about and up rooting the plants so that’s my own fault. I uncovered the tank today after a 3 day BO and its all gone and all fish seem to be ok and came racing over to the glass when I un covered the tank its great when you know your appreciated and some one is made up to see you, even if it is only because they want feeding LOL.
In the mean time I was board and I set up my first nano tank LOL

to give an idea of the size of this tank i have used a normal size pen.
The actual tank is the lid off the API master test kit.
9th March 2008
Time just seems to be flying by and I am getting no where with rescaping the tank.
I still haven’t got the plants I ordered and have had to re order them again.
So I set about designing the layout as I had only a mental picture in my head. Although the picture below is not the best I know what it is supposed to look like LOL.

The layout is not final and is likely to change before it is complete.
28th march 2008
Been a while since I updated so here we go.
I finally got my plants in but most didn’t arrive. I only ended up with 12 out of 25 I ordered so I haven’t been able to complete the re scape fully at the moment.
I still have a couple of plants to go in and have to still do the right hand side of the tank. but below is how the left side started off of which is going to change again.
this pic is 4 days after planting the "limnophila aquatica" at the rear left. it has shot up.
also at this time both sets of angels have spawned agin
I am going to start with the weekend:
9/10 february 2008:
I nearly lost my zebra danios yesterday morning. I had moved them last week into the tank I was using for the angel fry. All seemed to be ok and put in some plants so it wasn’t so bare and as a growing on tank for the plants.
Any way long story short I did a WC yesterday and all was ok. Last night they seemed to by a little dozy but not being to good my self I thought it was just me.I got a wake up call in the morning from my partner that something was wrong with them. I got and seen them and new some thing was wrong. Did a 75% WC and then did a water test.
OOOOhhhhhh boy no wonder they were not in best form. Ammonia had gone through the roof as had nitrites. Got them out I hope just in time and let them settle in the other tanks water before placing them back into the larger tank.Today they all seem to be picking up and getting back to normal.
BUT when I got up this morning I found I had lost one of my first fish I got “boasmani rainbow” I was devastated to have lost one of my best friends. Had her for 2yrs. So I did water checks again and the small tank ammonia 0 but nitrites still through the roof (only plants in there now) and checked the 240L and now I have .25 ammonia, and pH has dropped to 6 or less so for some reason every thing is going wrong this weekend and I don’t know why or what is happening I am just doing WC on the 240 in the hopes I get it sorted out and not lose any more friends.
This is my 240L tank set up 12mths ago. I have let it go over grown of late because of ill health but have just lately started to redo the tank.
It started as i was doing a WC and started to trim back a few plants, and one thing led to another and before i knew it i had trimmed every thing right back.
I wasnt planning on doing this but i started so i now have to finish it.
I trimmed all the plants starting on the right side of the tank and in doing so found two "ehinodorus ozolots that i thought i had lost some time ago. So i removed a lot od dead & damaged leaves to clear space for them to go back in. Although i didnt intend and have no replacement plants to go in the empty spaces as yet i re layed them the best i could to end up with what you see below.
On the left side i did the same sort of thing, i srtipped dead and old leaves to again leave gaps.
I removed all the plants on the left side as some were the worse for algae and cleaned them up the best i could. i am going to replant the left side with what i have left of the original plants.
I have noticed in the few days this has been going on that the tank is a lot brighter with not being so over grown and the plants are pearling more than ever.
its 12mths since setting the tank up and needs new tubes so they are on my shopping list at the present moment.
11th February 2008:
Yesterday (Sunday) I did water checks on the 240 and found ammonia had risen above zero of which I had never had I this tank since setting it up. I checked again this morning and found ammonia was still above zero but below .25 but was enough to have me worried as to why this has happened.
I have over the past few days done a lot of cleaning and moving plants around as well giving the filter a damn good clean out which was long over due as the filter pads where like a mud bath, I didn’t touch the bio balls when I cleaned the filter out.
I also today did another trim of the hair grass at the front left side of the tank. I am still trying to work out the best way to re plant what I have taken out and have in storage at the moment. I have also acquired some artificial bog wood pieces one of which I want to use in the tank but again haven’t yet decided on its position.
The tank stats at this time are:
pH = 6
ammonia = .25
nitrites = 0
nitrates = 5
kH = 2
gH = 4
p04 = 0
Although kH has risen from 1 the pH has dropped from 6.4 down to 6. so when ammonia has gone I am going to buffer to raise the kH to 5 and this should also raise the pH back up again.
12th February 2008:
I checked all stats again this morning and every thing was back to normal again.
Now all stats are safe again I want to get the pH & kH up higher. I am aiming for
kH of approx 5 and pH higher than 6.
I added 2 teaspoons of baking soda to approx ½ litre of tank water and mixed well till all had dispersed.
I waited 4 hours and rechecked the water stats. The pH had risen from 6 up to 6.4 and kH had risen from 2 up to 3 so I intend on adding another 2 teaspoons of baking soda tonight.
Given the last rise of 1 kH & .4 pH I would expect to see the same rise again which should take the reads to pH 6.8 & kH 4.
13th February 2008:
Checked all stats again this morning and I am now happy with the results although a little surprised at the kH, I had only expected a rise of 1dg.
The kH has risen by 2dg not 1dg as I had thought it would from 3dg to 5dg.
The pH has risen as expected from 6.4 to 6.6.
The full tank stats now are:
pH = 6.6
Ammonia = 0
Nitrites = 0
Nitrates = 5
kH = 5
gH = 4
P04 = 0
Conclusion:
I have added in total over 48hrs 4 teaspoons of baking soda to the 240L tank and this has had the result of raising the pH from 6 to 6.6 a rise of .6
kH has risen from 2dg to 5dg a rise of 3dg.
The stripped angels have spawned again (that’s another story) over night so I would assume all is ok with in the tank.
All that leaves me to do now is to finish re laying the tank as I have not been able to the last few days.
I need to finish the left side that have the plants tied with lead weights at the moment and to trim around the right side where the bog wood is. I am hoping to have this finished by the end of the week or early next week.
I think I have also created my own problem with trying to re lay the tank. with all the messing about over the last week I seem now to be going down the algae root again as I did last year with constant cloudy water and green dust algae on the glass.
I will be watching very closely over the next few days as to what is going on. I have removed a lot of the plants and I think that this could be the problem as there is to much nutrients in the water for them to take up. I am going to reduce the lighting over the next week by cutting out 1 set of lights and to see if this helps until the pants start to grow back or I can get my hands on some extra plants.
19th February 2008:
Well since the 13th all has been so so with the tank. There is a constant white mist in the tank at the moment but I have put this down the all the re arranging of the plants and a major gravel vac last week.
I am in the process of completely re scaping the tank and have already got a nice piece of bogwood for the new scape. I am just waiting for the plants to arrive which have been ordered but not 100% sure when they will arrive. Here are some pics of the bogwood.
The plants I have ordered are:
Name of plant qty tropica No
Bolbitis heudelotii x2 006
Ceratopteris thalictroides x2 005A
Cladophora aegagropila x3 000C (moss balls)
Hemianthuus callitrichoides x3 048B
Hygrophila corymbosa “red” x3 053
Hygrophila difformis x2 051
Limnophila aquatica x2 046
Nymphaea lotus x2 019
Pogostemon helferi x2 053H
Ricca fluitans x2 001
Shinnersia rivularis x2 053E
Total 25 plants
28th February 2008:
Well all is not what I had planned. I am having trouble getting my plants I ordered and lost the angel fry (again) and ended up having to do a BO to get rid of the pea soup in the tank. The GW was because of all the moving about and up rooting the plants so that’s my own fault. I uncovered the tank today after a 3 day BO and its all gone and all fish seem to be ok and came racing over to the glass when I un covered the tank its great when you know your appreciated and some one is made up to see you, even if it is only because they want feeding LOL.
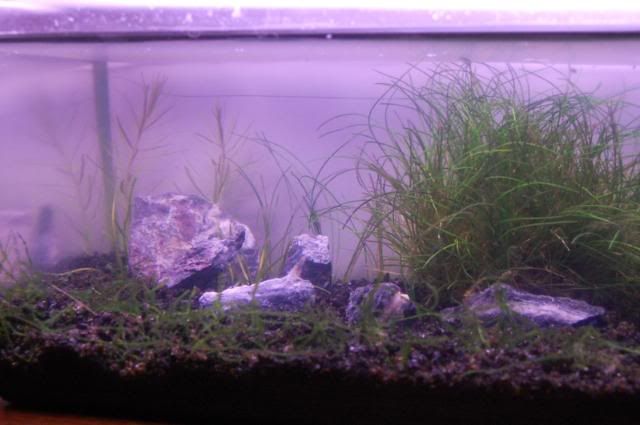
In the mean time I was board and I set up my first nano tank LOL
to give an idea of the size of this tank i have used a normal size pen.
The actual tank is the lid off the API master test kit.
9th March 2008
Time just seems to be flying by and I am getting no where with rescaping the tank.
I still haven’t got the plants I ordered and have had to re order them again.
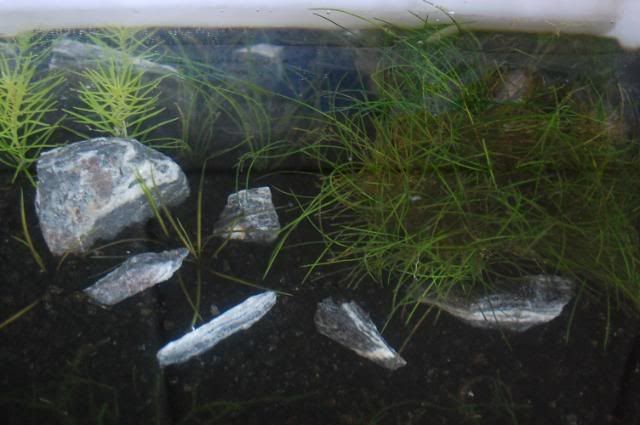
So I set about designing the layout as I had only a mental picture in my head. Although the picture below is not the best I know what it is supposed to look like LOL.
The layout is not final and is likely to change before it is complete.
28th march 2008
Been a while since I updated so here we go.
I finally got my plants in but most didn’t arrive. I only ended up with 12 out of 25 I ordered so I haven’t been able to complete the re scape fully at the moment.
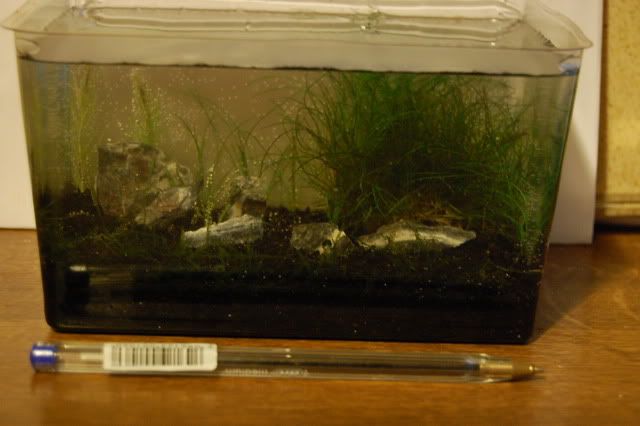
I still have a couple of plants to go in and have to still do the right hand side of the tank. but below is how the left side started off of which is going to change again.
this pic is 4 days after planting the "limnophila aquatica" at the rear left. it has shot up.
also at this time both sets of angels have spawned agin
Saturday, February 9, 2008
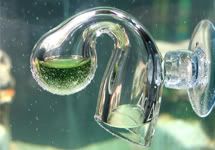
How Drop Checkers Work
The one problem people tend to have is how to check how much c02 is in the tank. This can be done one of two ways.
|

Thursday, January 31, 2008
Planting & pruning
Planting & Pruning you’re aquatic Plants:
With planted tanks starting to come into their own right along side fish tanks there is an untold amount of information on how to set up and keep them alive, but very little on how to look after the plants in respect of “planting and pruning” them. Here I hope to be able to give you at least the basics of planting & pruning your under water plants.
Basic plant lay out
There are 4 basic types of aquatic plants:
Stem.
Rhizome.
Root/potted.
Floating.
Stem plants:
Planting:
When getting ready to plant a stem plant, first cut with a scissors or knife an angled cut just above one of the healthy green nodes leaving as much of the plant as is possible. When you plant it, push the lower part of the fresh cut plant roughly half to three quarters of the depth of the gravel. Allow enough space between plants to allow light to reach the lower leaves. Stem plants are usually planted in their own random patterned group using five to eight stems. When the stem plant finally grows to the top of your aquarium, it will have rooted and sent out white roots in some species, from the nodes all the way up the plant.
Pruning:
Long-stemmed plants should be trimmed to size that will complement and be in balance of the rest of the tank layout. The scissors should be as sharp as possible. Two or three new leaves will grow from each cut, so the plants may become top-heavy with growth after too much trimming and the stems will break easily. When this starts to happen, trim the plants less often and higher up on the stem. The cut off heads can also be re-planted if wanted.
STEM PLANT CUTTING:
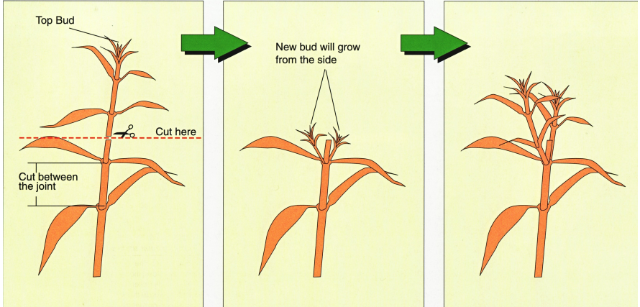
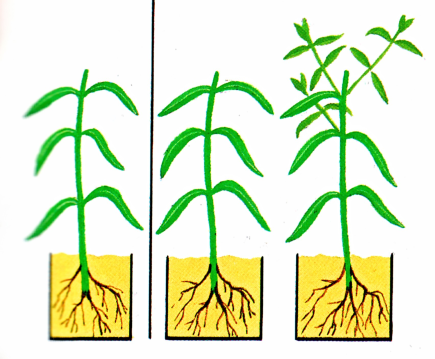
Top cutting: the top part of the plant is the active growing part so makes for the most reliable of cuttings.
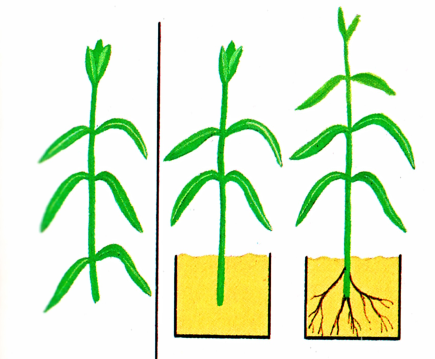
Middle cuttings: Although mid sections can be used they will take longer than top sections to establish as they have to not only grow roots but also side shoots to form healthy growth.
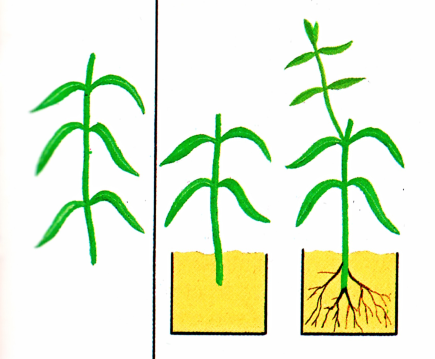
Bottom cuttings: when top or middle section pruning has been done the lower section can be left in check and will form new buds from where it has been cut.
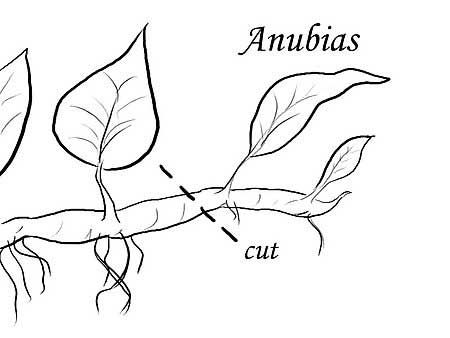
Rhizome plants:
Planting:
Plants with rhizomes “DO NOT GET PLANTED” they are attached to wood, rock or décor or simply sat on top of the substrate.
Anubias: (one of the most popular aquatic plants) are strong and can live for a long time, but Anubias leaves get covered with algae very easily, so if you spot any ugly looking leaves (dead, algae-covered, full of holes, etc,) remove them quickly, and new leaves will grow. You can also cut the rhizome of the Anubias if it starts growing in a direction you don't want (and you can replant the cut part).
Ferns: such as Microsorum (java fern) and Bolbitis grow quickly and will soon over take the balance of the layout. Leaves should be removed once they become too big or old. Microsorum develops black spores under its leaves for reproduction. The ugly spores and secondary rhizomes should be removed carefully so as not to damage the main rhizome.
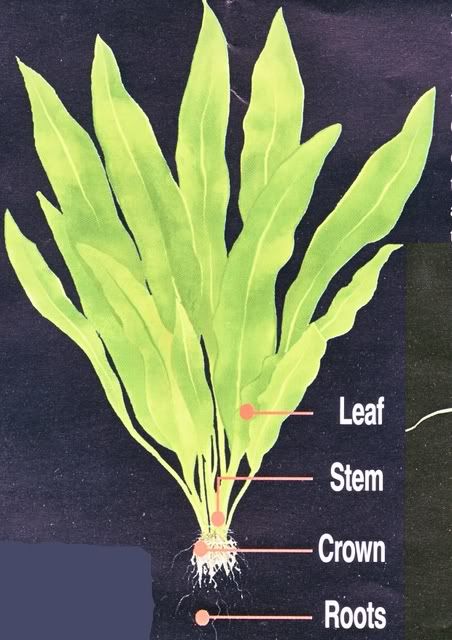
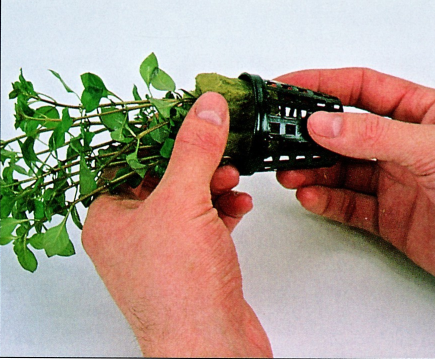
Rooted/pot plants:
Planting:
Potted plants: are supplied with the plant specimen rooted into mineral wool inside a slatted plastic pot. To plant, cut off the pot or gently tap out the mineral wool bound root portion if root growth allows.
Tap the pot and remove the plant with all the rock wool
Gently separate the wool.
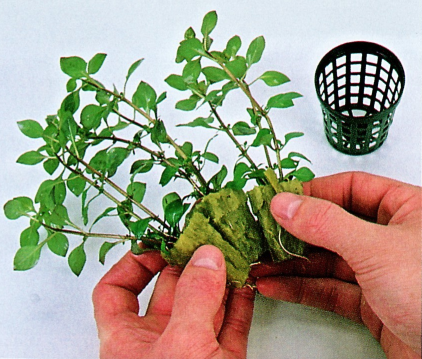
Some potted plants can have between 3 and 4 or more separate plants.
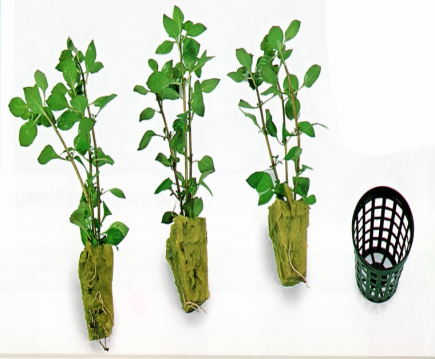
Gently remove the mineral wool from the roots (If some mineral wool remains this will not have any adverse or detrimental effects) and then can be planted. Spread the roots out to prevent “Bunching” which can cause root rot and trim any excessively long roots to size.
The above plants are trimmed the same as stem plants in between the leaves.
Cryptocoryne’s: also need to be trimmed! The most important thing about cutting Crypt leaves is to cut it right at the bottom, otherwise you will be surprised by a nasty mass of dead matter after lots of wrong trimmings.
Plants with runners:
Other plants include those that grow runners from their roots E.G. valls.
Depending on what the plant is they are normally held together by a lead type weight or in a pot with wool(hair grass) for example.
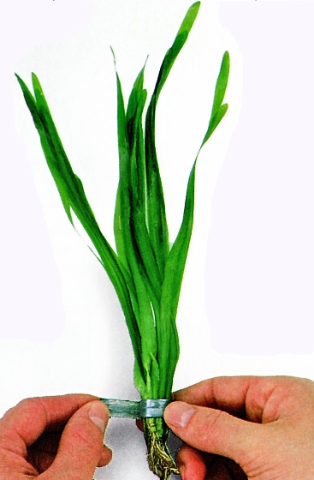
Then separated into individual plants ready for planting.

Propagating plants with runners:
Small and large plants that grow runners are separated by cutting in between each new growth.
Small ground plants that produce runners are no different in the technique used for planting.
When plants that grow from runners, like E. tenellus, Glossostigma, Vallisneria, and Sagittaria, become too thick, their roots will suffocate unless they are trimmed. Sagittaria and Vallisneria don't grow over themselves no matter how thick they get, so simply removing dead leaves from time to time is sufficient. E. tenellus and Glossostigma are small plants, however, and when they become dense, the leaves will pile up five or six leaves deep and the lower ones will become completely asphyxiated. These grow along the walls, so carefully cut and remove the runner around 7cm from the wall to prevent overgrowth.
Floating plants:
These are exactly what they say they are, floating plants. once they have been removed from any packaging they are simply placed in the water surface and left to float.
CAUTION:
With floating plants they can very quickly over run the whole surface area with out you realising it and block out light to lower plants this could cause an algae problem for higher light plants below if they are restricted from their light source.
Tuesday, January 22, 2008
Planted tanks 2
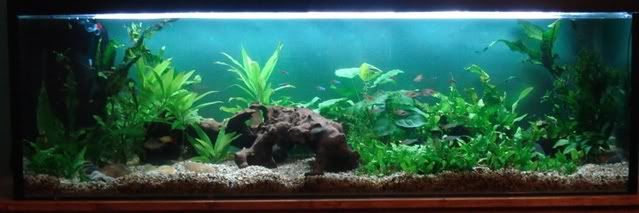
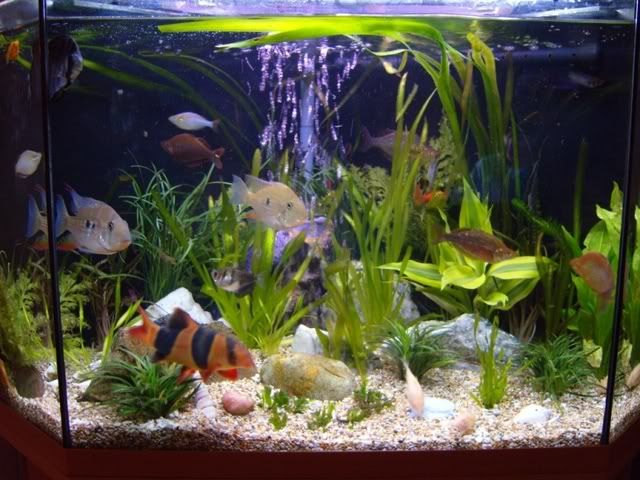
Kittiwakes low light tank

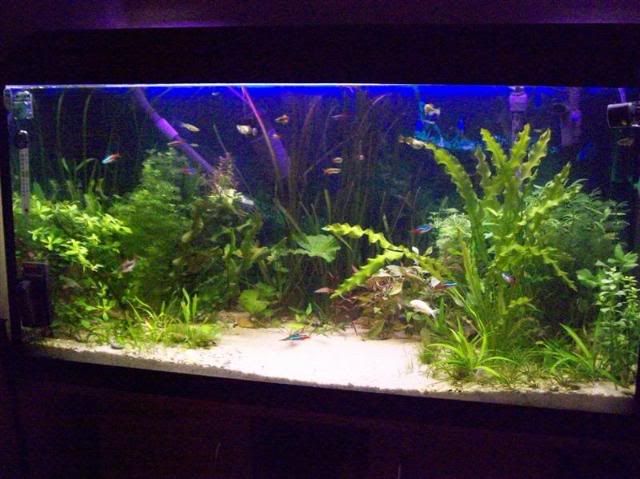
Tank 180L(47.5g) Lighting 2.4wpg, no CO2 injection, no significant plant feeding except regular water changes, fish waste and the occasional plant food dosing (~once a month). Whilst things don’t grow like crazy there is reasonable growth. If I spent a bit of effort on the plants I could probably get better growth but I am happy with how it is. Only problem is Amazon sword grows out of tank then frazzles its leaves on the luminaire.
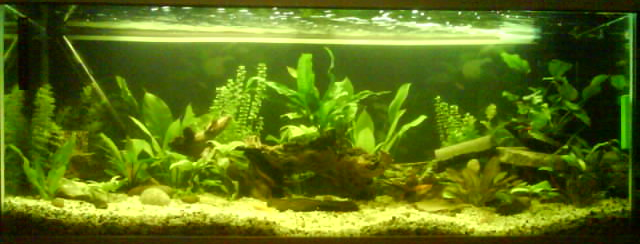
Bill's low light tank
160L community tank with 38w lighting= 43 US gal = 0.88wpg! No Co2, API Plant Zone weekly.That's supposed to be only able to support stuff like java moss and Anubias.
Curlywigs Tank
Wilson's Tank

Pauldrinkwater's tank
Fenn444 tank
Tank 180L(47.5g) Lighting 2.4wpg, no CO2 injection, no significant plant feeding except regular water changes, fish waste and the occasional plant food dosing (~once a month). Whilst things don’t grow like crazy there is reasonable growth. If I spent a bit of effort on the plants I could probably get better growth but I am happy with how it is. Only problem is Amazon sword grows out of tank then frazzles its leaves on the luminaire.
Bill's low light tank
160L community tank with 38w lighting= 43 US gal = 0.88wpg! No Co2, API Plant Zone weekly.That's supposed to be only able to support stuff like java moss and Anubias.
Curlywigs Tank
Wilson's Tank
Pauldrinkwater's tank
Fenn444 tank
Subscribe to:
Posts (Atom)