Items needed: (pictures will be in the next post) 1. gas cylinder (fire extinguisher) 2. c02 regulator gauge (preferably with needle valve) 3. needle valve (if not with gauge) 4. solinoid 5. c02 tubing 6. check valve (anti flow valve) 7. diffuser Gas cylinders: Fire extinguishers are one of the best options as they have the correct fitting for the most used and available gauges on the market. Pub c02 cylinders can be used but adapter units have to be used to convert male thread to female thread for the gauge. Gauge/regulator: There are many different types and designs on the market with different designs and reliability, ranging from very cheap to very expensive. From just the basic gauge with pressure only to twin gauge with needle valve to fine tune the amount of c02 released from the bottle. The latter, gauge with needle valve is by far the best option to go for. If a gauge on its own is bought then a needle valve MUST be bought separately. Needle valve: The needle valve allows for very fine adjustment of the c02 coming out of the cylinder. solinoid the solinoid turns the unit on & off via electicity. plug this into a timer so it turns on 2hrs before lights on and off 2hrs before lights out. C02 tubing: Standard c02 tubing is adequate to use. There is a lot of disagreement on tubing as to how much c02 can leak THROUGH the wall of the tubing. Check valve: A check valve imo MUST be used. When the c02 is turned off at night (or god forbid a power cut) the flow and gravity will draw water up the tubing from the tank and then run into the mechanism of the gauge and cause serious damage. Diffuser: An ordinary air stone can be used but not recommended for c02 use as the bubbles will be bigger from the stone than from the diffuser, which will give out tiny minute bubbles which will disperse more easily into the water, as the whole idea of c02 is to get as much into the water as possible. Diffuser Placement: The placement of the diffuser is important, again so as much c02 gets dissolved into the water. You will get better c02 saturation if the diffuser is placed under the flow of water being pumped back into the tank so the c02 bubbles get swirled/churned up. Some people but not all, place the end of the tube in to the up take pipe so the c02 gets directed into the filter, were it gets churned up even more than any were else in the tank. The only problem with this is that many say that it makes the filter noisy and causes damage to the filter. I have not used this method so can’t give any real answers only to say I can see both sides of the argument. ok now for the pictures. pub cylinder:  not the best to be used but can be if you can get the male/female thread adaptor. fire extinguisher thread.  all common gauges use this thread and is easy to purchase any were. gauge with regulator and needle valve attached. 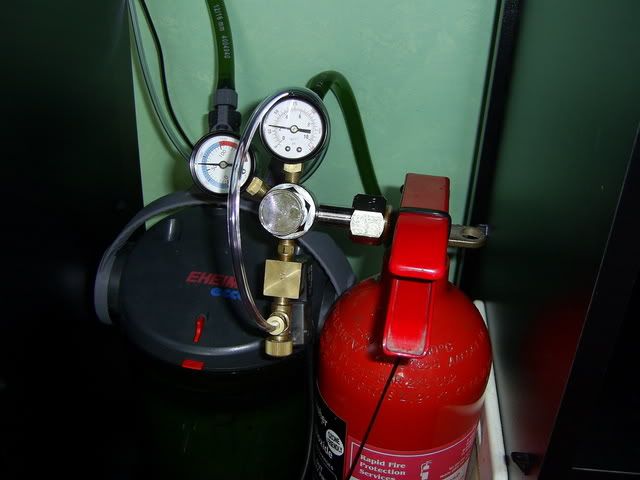 the left gauge is the pressure in the tank and the right is the flow of c02. the needle valve is the small serated knob just under were the tube enters the gauge. the solinoid is the square brass part just above the c02 tubing, and has a cable with a plug on the other end. diffuser.   you can see by these pics the fine mist of c02 coming out of the diffuser. the finer the bubbles the better dispersion into the water. here is the link to regulator that i have. http://cgi.ebay.ie/ws/eBayISAPI.dll?ViewItem&item=250094277504&ssPageName=ADME:B:EOIBSA:IE:11 |
DIY YEAST c02 SET UP
If you have a small aquarium or cant afford a full c02 injection set up then all is not lost as you can make diy yeast set up very easily and very cheaply using basic 1 or 2ltr pop bottles. How to make the reactor: Take a large enough pop bottle and thoroughly clean it under clear warm running water. DO NOT USE any form of detergent. Let the bottle dry out. One you have your clean bottle Drill a hole in the centre of the cap so the tubing will fit through. Insert the tube so approx 1inch goes through the cap and silicone around the tube to make an air tight seal and let it dry. 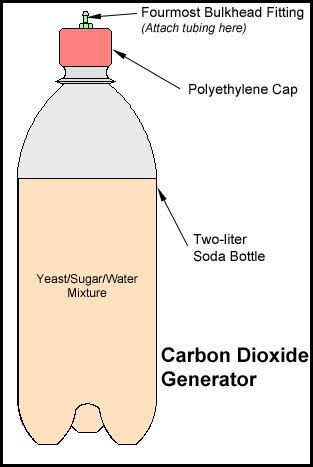 WARNING: Use only a plastic bottle that has had fizzy drinks in it. DO NOT USE GLASS. To make up the yeast mix you will need: 800ml water ¼ to 1 teaspoon of yeast 200g sugar 1/2 to 2 teaspoon bicarbonate of soda (if required) The bicarb in the mix helps stabilise the mixture but is not necessary to use. There are a few different recopies that can be used and is a case of finding out which one suits you best. Put the sugar in the bottle first then add the yeast and then the water make sure you use tepid water at approx 30°C/86°F if the water is to cold then the mix will not react and to hot it will kill the yeast. Replace the cap with the tubing attached on the bottle and tighten.Run the tubing into the tank, and place the end under the filter intake as this will help to swirl the c02 bubbles around the tank and help to break them up. A glass diffuser wont work with a diy system as the pressure is not sufficient to be forced out of the ceramic ring. An air stone will work well and will help to diffuse and make smaller bubbles. This recipe will normally last approx 2 weeks but will need to be changed before it reduces to nothing as too many fluctuations in c02 can lead to algae problems in the tank. |